Building a WordPress site with a page builder is much easier. One alternative to the standard Gutenberg block builder is Elementor. You can download Elementor for free from the WordPress plugin library. With Elementor, you can easily build content without programming skills using drag-and-drop blocks. At the same time, you will see your page almost in the same form as it will be when it is published.
The basic version of Elementor does not include the Elementor's Form Builder. The form builder is a feature of Elementor Pro. The Elementor Pro has many more functionalities overall, therefore Elementor Pro is often installed on websites on top of the basic Elementor. One good reason to get Elementor Pro is precisely its easy-to-use element for building the forms. With this element, you can add, for example, a contact form to your site very quickly and easily. It is also easy to change the fields and layout of the form.
There is plenty of material to get started with Elementor on their support page: Elementor help.
Below I explain how to add the form to your page. There is also plenty of information on adding form functions and modifying the appearance of the form on the same Elementor support pages.
At the same time, it is important to consider the security of the form. Spam bots find your form very quickly after publishing, so it is worth protecting it from spamming by bots.
Installing an Elementor form
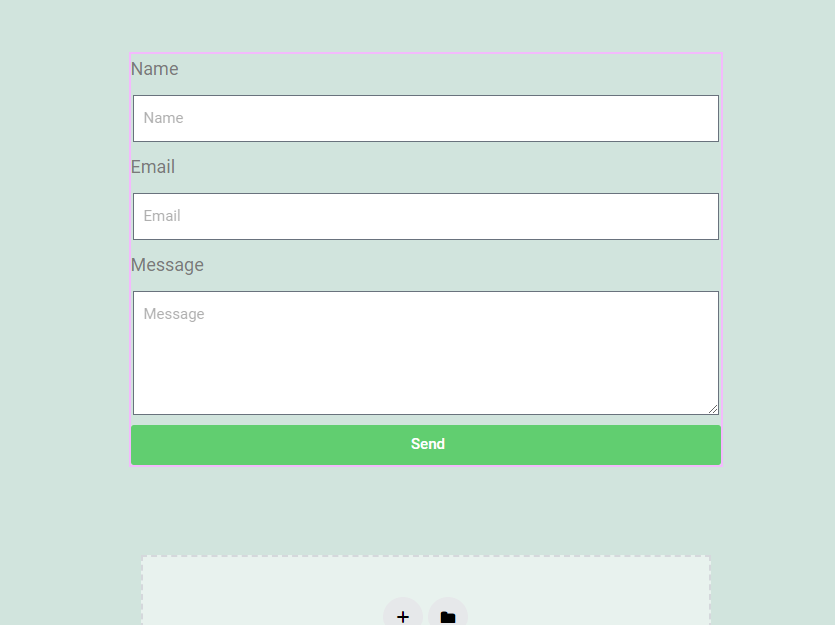
Open the page you want to edit by selecting "Edit with Elementor".
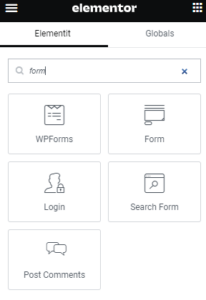
In the sidebar on the left side of the view, you will find elements that can be dropped onto the page. If you are using the Pro version, the “Pro” elements will be found immediately below the “Basic” elements. The easiest way to do this is to type the word “form” into the search widget at the top.
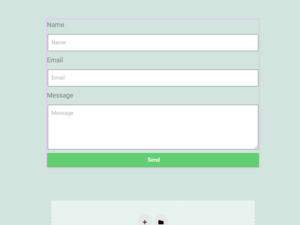
Drag and drop the “Form” element on your page to the “Drag widget here” position. When dropped, the element will transform into a draft form.
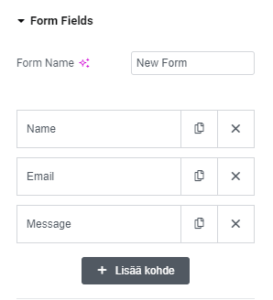
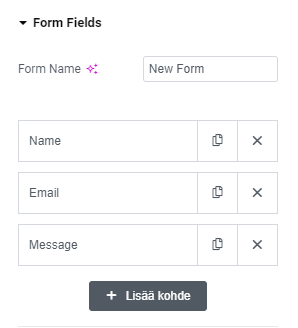
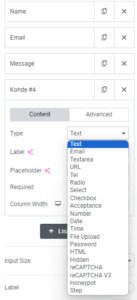
You can select more fields and change existing fields from the “Form Fields” section in the left sidebar. Add a field by pressing “+ Add item”.
You can protect the form in Elementor Pro with the standard security measures found in Pro.
In the “Form Fields” section, click “+ Add item.” Then select “Honeypot” from the bottom of the drop-down menu.
The field will become invisible on the form itself. Remember to save the page by clicking "Update" at the bottom of the page. Nothing else is needed.
A honeypot is usually a moderately good protection method. However, the bot test tool on this website was tested and it sent easily mail through a honeypot-protected Elementor Pro form. The standard security measures of the Elementor Pro form also include Google's Captcha. Installing Google Captcha is not covered in this article, as it requires registration with Google. Google also has its own requirements for the use of Captcha and in some cases separate sensitivity settings.
Protecting your Elementor form more efficiently with a plugin
The easiest and most effective way to protect your Elementor Pro form from bots is to use the Bot Spam Block plugin. The plugin has been specially developed to block spam sent by bots. The only setting for the plugin is the license key. Otherwise, the plugin is lightweight and works both efficiently and automatically without unnecessary settings. It also does not create additional frustration to the actual user of the form, because the user does not have to solve additional tasks or riddles.
Elementor and dxw3 now offer a bundle where the buyer of Elementor Pro gets dxw3 Bot Spam Block plugin for free.
This requires that you 1) order the Elementor Pro plugin by clicking the image below.
And 3) come back here to shop and redeem the plugin with the coupon code.
We use cookies on our website to ensure the functionality of the website, provide social media features, and analyze data. We share information about your use of our website with our advertising and analytics partners.
×
Consent Settings
dxw3 Consent
WordPress plugins
Integrations
Ticket Sales – Finance Software – Passeli Merit
TargetAutomatic invoicing and order tracking from online store to financial management.
SolutionWooCommerce integration for a ticket shop that creates an invoice in Passeli and updates the order status after payment.
ResultThe integration automatically exports the necessary invoice information to the financial management system, creates the invoice, and updates the invoice status in WooCommerce. Manual processing is eliminated.
TechniquesPHP
Product Deliveries – DB eSchenker Booking
TargetTransfer of delivery information, placing a delivery order, and creating parcel labels in connection with the delivery processing of the order.
SolutionA plugin for WooCommerce that creates packages and sends a delivery order to the DB Schenker API, as well as creation of the parcel labels.
ResultDelivery orders can be handled directly from WooCommerce without a separate login to DB Schenker.
TechniquesPHP
Operations Management – Easoft ERP
TargetSynchronize online store products, orders, and inventory status with Easoft's ERP system in real time.
SolutionA WooCommerce plugin that connects products used with ERP product numbers and transfers orders to Easoft via API. Includes inventory balance synchronization.
ResultInventory balances remain up to date and online store orders are also synchronized in real time to the ERP system, where all orders are centrally processed.
TechniquesPHP, WooCommerce REST API, JSON
Trading – Nettix
TargetDisplays Nettix ads on the site under desired conditions.
SolutionThe add-on retrieves notifications from the Nettix trading system and displays them in the specified locations.
ResultThe visibility of targeted ads increased and visitors can find them quickly.
TechniquesPHP
Sales Customer Relationships – Pipedrive
TargetAutomatically transfers course buyer and participant information, and creates comments and activities to Pipedrive.
SolutionA plugin that sends customer and order information to Pipedrive and creates reminders for the sales team.
ResultSales can target actions in a timely manner and customer information is centralized. Potential repeat customers can be contacted in a timely manner.
TechniquesPHP
Other plugins
Bonus System
TargetIncrease employee motivation and monitor productivity in online shopping.
SolutionA plugin that records employee productivity and automatically calculates bonuses.
ResultBonuses are generated from the system directly for use by payroll administration.
TechniquesPHP
Cookie Consent
TargetAsks for permission from the user before collecting information in accordance with GDPR.
SolutionA lightweight commercial add-on that doesn't slow down the site but implements cookie consent.
ResultThe site meets the requirements without performance degradation.
TechniquesPHP
Kourubotti – The Customized Online Webshop
TargetSell the complete package: products and installation with dynamic pricing based on customer needs.
SolutionA customized add-on that implements a separate online store. The add-on prices the entire package immediately and allows you to choose the installation time. Customers authenticate securely using Telia’s strong identification system.
ResultThe customer receives the delivery time and price of the entire package immediately.
TechniquesPHP
Google Core Web Vitals – Monitoring
TargetMonitor and optimize site performance based on user experience.
SolutionA plugin that tracks page performance, in the similar way to CruX data tracking. The plugin identifies poorly performing pages.
ResultCorrectly targeting actions to problem pages. Better visibility on Google and a better user experience.
TechniquesPHP, JavaScript
Fast and Simple Contact Form
TargetSimple customer contact without performance impact.
SolutionA simple contact form that requires no external library dependencies.
ResultContacting works quickly and reliably on all sites.
TechniquesPHP
Automated Competitor Price Monitoring
TargetMonitor competitors' price levels from your online store's dashboard.
SolutionA plugin based on web scraping technology that tracks competitor prices for the same products.
ResultThe retailer is able to react quickly to competitors' price changes.
TechniquesPHP, Web Scraping
Form Spam Block Plugin
TargetAutomatically blocks form submissions made by bots.
SolutionA commercial plugin based on ghosting technology that requires no separate settings. Works with numerous forms, such as contact form, login form, and comment form.
ResultSpam emails are blocked without additional load on the site.
TechniquesPHP, Ghosting
Automatic Translator / Google Translate
TargetAutomatically translates pages, articles and menus into another language.
SolutionIntegration with Google Cloud Translate.
ResultMultilingual website without manual translation work.
TechniquesPHP
Plugin Grouper – wordpress.org
TargetEasily group plugins from the same developer in the WordPress plugins admin view.
SolutionA plugin published on WordPress.org that allows you to group plugins.
ResultPlugin management is simplified for sites with multiple plugins in use.
TechniquesPHP
Customized website solutions
Spam Test for Testing Form Security
TargetTest the functionality of a site's protection against spam bots.
SolutionSimulates a form bot's behavior and returns the result.
ResultThe developer receives immediate feedback on whether the form security on their site works in practice.
TechniquesPHP, Web Scraping, Crawling
Mathematical Model of Collective Investment
TargetCreate a model portfolio based on user success.
SolutionUsers gain reputation by successfully investing in company stocks, which affects their weighting in the model portfolio.
ResultDynamic model portfolio and user ranking.
TechniquesPHP
Ticketing Participant Types and Quantity Management
TargetLimits the number of different participants in events by ticket type.
SolutionAn add-on that tracks sales volumes and prevents limits from being exceeded.
ResultSales remain within the rules and are controlled from the control panel.
TechniquesPHP
Video Library for a Yoga Website
TargetMakes it easier for users to find videos from a wide selection.
SolutionCollects watched and unfinished videos and suggests new ones based on the user's previous choices.
ResultImproved user experience and better utilization of video content.
TechniquesPHP, JavaScript
B2B Store for WooCommerce
TargetEnables different product portfolios and pricing for corporate customers.
SolutionA WooCommerce plugin that uses customer-specific discounts and views.
ResultTargeted sales to corporate customers under predefined terms.